Programming in Bash/Python
Basically the DiffusionKit is a well self-contained package which implements most of the required modules for diffusion MRI processing and analysis. Additionally, if you want to use script for batch processing for a cohort of subjects, we recommend using Python or Bash. Both of them are inherited for Linux system, and for MS/Windows one can use Anaconda and Git-bash, separately.
The Python is easy to learn for basic use as a script language, although its powerful functions largely depend on 3rd party packages. To this end, we have several suggestions to begin with it. First, take a couple of hours to go through the primary Python grammars. There is a large bundle of free but kind tutorials from internet (Google “Python tutorial” or related keywords). You can choose the websites according to your preference. If you are a newbie of Python, don’t think about which version is appropriate for you and just use the latest version (Python>3.0) (In the current stage, you only need to note the difference of “print” function in different versions, which I think is not a smart change from version 3.0); and don’t waste money to buy a book since the materials from the internet are largely beyond your capacity. Several tutorial links are listed here:
For English users
- https://en.wikibooks.org/wiki/A_Beginner%27s_Python_Tutorial, a short tutorial
- http://askpython.com/, a short tutorial
- http://www.learnpython.org/, an interactive sandbox
For Chinese users
- http://www.runoob.com/python3/python3-tutorial.html, a nice tutorial
- http://www.cnblogs.com/vamei/archive/2012/09/13/2682778.html, python and advanced
- http://woodpecker.org.cn/abyteofpython_cn/chinese/, a complete reference
If you prefer to use shell script, like Bash, you can also find some entrances for tutorials. The shell script itself is easy to follow and it is a powerful tool to concatenate the underlying execution functions. It should be noted that the Bash script is only for *nix system, so it is not suitable form cross-platforms. Several tutorial links are listed here:
For English users
- http://linuxconfig.org/bash-scripting-tutorial, a short introduction
- http://www.tldp.org/LDP/abs/html/, a complete tutorial
- http://www.learnshell.org/, an interactive sandbox
For Chinese users
- http://blog.jobbole.com/85183/, a short tutorial
- https://serholiu.com/bash-by-example, several simple examples
- http://c.biancheng.net/cpp/view/6998.html, a complete tutorial
Getting Started
For your convenience, we’ve created two bash scripts the Advanced and the Primary, which enable processing multiple data within a loop. The instructions for using the Advanced bash script are provided in Download Page.
In this tutorial, however, we would go through the processing pipeline with the Primary bash script, which contains more features and options. It should be noted that both the Advanced and the Primary scripts can be run in simple Bash environment or emulation, since they utilize extremely basic Bash commands. So, even in MS Windows, you can run these two scripts by a Bash emulation, such as git for Windows (STRONGLY recommend), which provides a light but awesome Bash emulation. When you install this emulation, the Primary script can ben run directly once you prepared all the required data (DO remember to add the DiffusionKit installation path to your system search path). And the Advanced script need an additional Makefile-based environment.
Preprocessing
Starting from this section, we would go throught the pipeline provided in DiffusionKit, assuming DiffusionKit is properly installed following Installation Instructions, along with the Example Dataset downloaded on your hard disk.
Data Format Conversion
Analyze format and Nifti format are the data formats that supported by DiffusionKit. If your image data is in DICOM format, you need to convert the data into Nifti format.
To convert DICOM format to Nifti format, please check the checkbox “DICOM to NIfTI” in the main window and input the data directory that contains DICOM files.
GUI-Frontend Usage
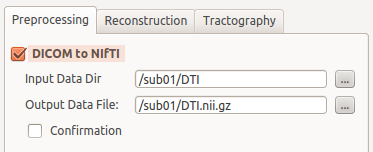
Figure 1. Convert data format.
Command-Line Usage:
$ dcm2nii -o /path/sub01 -f DTI /path/sub01/DTI
Eddy Current Correction
DiffusionKit has motion correction function which is implemented with a affine registration method. To correct the effect of head motion, please check the checkbox “Eddy Current Correction” and import the original diffusion-weighted imaging data.
GUI-Frontend Usage
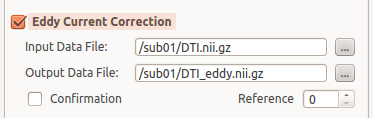
Figure 2. Eddy current correction.
Command-Line Usage:
$ bneddy -i /path/sub01/DTI.nii.gz -o /path/sub01/DTI_eddy.nii.gz -ref 0
Skull Stripping
The next step is removal of extra-meningeal tissues from the MRI image of the whole head. The function of Skull Stripping is to delete non-brain tissues from an image of the whole head. An accurate brain mask will accelerate the following reconstruction.
To achieve the mask of brain, please check the checkbox “Skull Stripping” and input the image (e.g. the b0 image) you want to operate.
GUI-Frontend Usage:

Figure 3. Skull stripping.
Command-Line Usage:
$ bet2 /path/sub01/DTI_eddy.nii.gz /path/sub01/DTI_eddy_brain.nii.gz -m /path/sub01/DTI_eddy_mask.nii.gz -f 0.5
Diffusion Model Estimation
DTI Estimation
When we complete the preprocessing, we can do the job of DTI estimation. In this step, you can get diffusion tensor image and derived diffusion indexes (e.g. fractional anisotropy, mean diffusivity, radial anisotropy etc.) from the reconstruction. For GUI-frontend, please change to the “Reconstruction” label and make sure the “Output Type” is DTI. Input the files into the boxes in the “Reconstruction” Panel according to the illustrations in Figure 4.
GUI-Frontend Usage:

Figure 4. DTI estimation.
Command-Line Usage:
$ bndti_estimate -d /path/sub01/DTI_eddy.nii.gz -g /path/sub01/DTI.bvec -b /path/sub01/DTI.bval -m /path/sub01/DTI_eddy_mask.nii.gz -o /path/sub01/DTI_eddy_dti -tensor 1 -eig 1
HARDI Estimation (Optional)
DiffusionKit also includes advanced HARDI reconstructions which implemented with two types of HARDI methods, the Spherical Polar Fourier Imaging (SPFI) method and Constrained Spherical Deconvolution (CSD) methods. If you have DWI data with considerable number of gradient directions (more than 45 directions) and high b-value (larger than 2000) [ref], you can apply HARDI estimation to resolve crossing fibers in the reconstruction. To call the HARDI reconstruction, change the “Output Type” to HARDI and select the HARDI method (SPFI or CSD) you want in the “Reconstruct Parameters” section. The compulsory parameters for HARDI estimation is data input and output. The example of parameters setting is illustrated in Figure 5&6.
GUI-Frontend Usage:
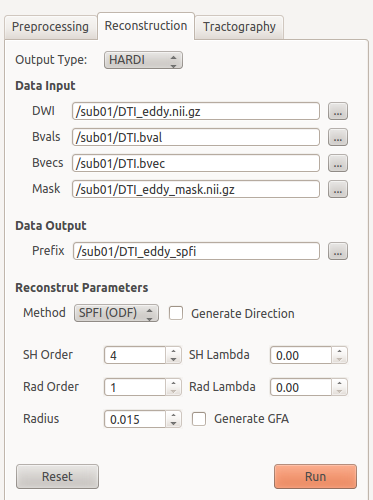
Figure 5. HARDI estimation using SPFI method.
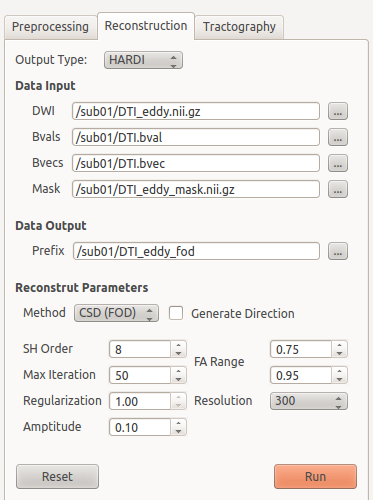
Figure 6. HARDI estimation using CSD method.
Command-Line Usage:
$ bnhardi_ODF_estimate -d /path/sub01/DTI_eddy.nii.gz -g /path/sub01/DTI.bvec -b /path/sub01/DTI.bval -m /path/sub01/DTI_eddy_mask.nii.gz -o /path/sub01/DTI_eddy_spfi
$ bnhardi_FOD_estimate -d /path/sub01/DTI_eddy.nii.gz -g /path/sub01/DTI.bvec -b /path/sub01/DTI.bval -m /path/sub01/DTI_eddy_mask.nii.gz -o /path/sub01/DTI_eddy_fod
Tractography
DiffusionKit provides the function of fibertracking which is implemented with a deterministic streamline method. You can perform tractography using the diffusion tensors reconstructed with DTI or diffusion/fiber ODFs reconstructed with SPFI/CSD. To call the function of fibertracking, change the “Processing” Panel to “Tractography”. Select the data type (DTI or HARDI) according to the data you used (tensor or diffusion/fiber ODF). Input the FA map acquired in DTI estimation to the box of “FA”. Provide the seeds image based on your research. For instance, if you want to do whole brain fibertracking, you can input a whole brain mask in the box of “Seeds”. You can adjust other tracking parameters to satisfy your study. Please refer to the illustration in Figure 7&8 for more details.
GUI-Frontend Usage
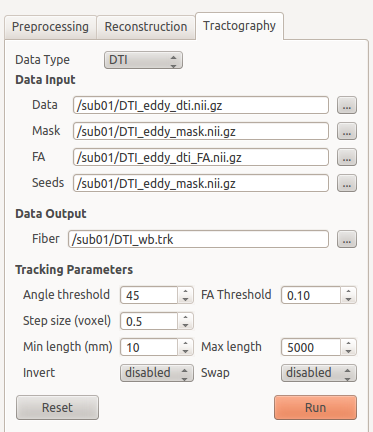
Figure 7. Fibe tracking based on DTI.
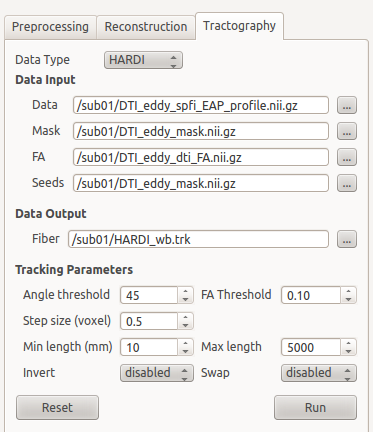
Figure 8. Fiber tracking based on HARDI.
Command-Line Usage
$ bndti_tracking -d /path/sub01/DTI_eddy_dti.nii.gz -m /path/sub01/DTI_eddy_mask.nii.gz -s /path/sub01/DTI_eddy_mask.nii.gz -fa /path/sub01/DTI_eddy_dti_FA.nii.gz -o /path/sub01/DTI_wb.trk
$ bnhardi_tracking -d /path/sub01/DTI_eddy_dti.nii.gz -m /path/sub01/DTI_eddy_mask.nii.gz -s /path/sub01/DTI_eddy_mask.nii.gz -fa /path/sub01/DTI_eddy_dti_FA.nii.gz -o /path/sub01/DTI_wb.trk
Construction of brain networks
When we get connectivity data from tractography, we can consider construction of brain networks. A network is a collection of nodes and links (edges) between pairs of nodes. In structural brain networks, we select specific ROIs of brain as nodes and the number of fibers which end in the pair of ROIs or other derived diffusion indices as edges. DiffusionKit provides the function of bn_network to construct brain network using given ROIs and whole brain tractography achieved from last step. Only command-line usage is available for bn_network. A text file which contains the paths and ROI filenames is needed to input when performing bn_network. Please refer to the example script and example data for details.
Command-Line Usage
$ bn_network -fiber /path/sub01/DTI_wb.trk -roi /path/sub01/roi.txt -outfiber 1 -o /path/sub01/network.txt